Django + Webpack Series: 1. Setup and SCSS


Why Webpack?
Django still proves to be one of the most popular and solid popular back-end frameworks in 2022.
However when it comes to front-end, compared by the more popular front-end frameworks such React, Angular, and Vue Django by default lacks lots of the modern features offered in the other front-end framework. Lucky we can use webpack to bring Django to the modern, fun, efficient ways of the modern front-end.
When searching for a solution we had some requirements to fulfill:
- support hot-reloading to ease development
- generated files to have hashes in file names, this help us avoid cache problems in production environments we don't control
- Have good support for source maps to quickly and easily identify source of errors and bugs.
Adding webpack + npm
Make sure that you have the latest node version installed on your system, then start by adding npm configuration file to your project:
npm initAfter that we will add some basic npm scripts to package.json help us with running webpack commands
...

  "scripts": {
    "build": "webpack",
    "watch": "DEBUG=True && webpack server"
  },

...After that add the basic required packages to setup webpack and compile SCSS:
# webpack dependecies
npm install --save-dev webpack webpack-cli webpack-dev-server

# scss dependecies
npm install --save-dev sass-loader style-loader mini-css-extract-plugin css-loader node-sass

# django dependecies
npm install --save-dev webpack-bundle-tracker
lets add some basic web pack configuration that supports scss and fonts, add a new file webpack.config.js to the root of your project:
const path = require("path")
const BundleTracker = require('webpack-bundle-tracker')
const MiniCssExtractPlugin = require("mini-css-extract-plugin")

// check if we are running in production, make sure you use the same env var for both django and webpack
const isDevelopment = (process.env.DEBUG || "false").toLowerCase() == "true";

module.exports = [
    {
        target: 'web',
        context: path.resolve(),
        mode: isDevelopment ? "development" : "production",
        entry: {
            main_style: './assets/scss/main.scss',
        },
        output: {
            path: path.resolve('./dist/'),
            filename: "[name]-[fullhash].js",
            clean: true,
            publicPath: isDevelopment ? 'http://localhost:9091/' : undefined,
        },
        devServer: {
            port: 9091,
            headers: {
                "Access-Control-Allow-Origin": "*",
            }
        },
        devtool: isDevelopment ? "eval" : "source-map",
        plugins: [
            new BundleTracker({ filename: './webpack-stats.json' }),
            new MiniCssExtractPlugin({
                filename: "[name]-[fullhash].css",
                chunkFilename: "[id]-[fullhash].css",
            }),
        ],
        module: {
            rules: [
                {
                    test: /\.s[ac]ss$/i,
                    use: [
                        isDevelopment ? "style-loader" : MiniCssExtractPlugin.loader,
                        {
                            loader: 'css-loader',
                            options: {
                                sourceMap: isDevelopment
                            }
                        },
                        {
                            loader: 'sass-loader',
                            options: {
                                sourceMap: isDevelopment
                            }
                        },
                    ],
                },
                {
                    test: /\.(woff(2)?|ttf|eot|svg)(\?v=\d+\.\d+\.\d+)?$/,
                    type: 'asset',
                    generator: {
                        filename: 'fonts/en/[hash][ext][query]',
                    },
                }
            ]
        }
    }
]
The config file above may seem intimidating, while we will not explain every setting in webpack configuration in this article, we will focus on some key parts to understand:
1- Our entry point main_style at PROJECT/assets/scss/main.scss
2- Will run a webpack development server to make hot-reloading possible during development at port 9091 . When compiling in production mode we will output the static file to PROJECT/dist/
3- Will output compilation info to PROJECT/webpack-stats.json. This will file be used to help Django find the static files.
Connecting Django
Before we start with configuring Django we need to include one library that will make this possible django-webpack-loader :
pip install django-webpack-loaderNow we will need to do some modifications to our django settings file
INSTALLED_APPS = (
     ...
     'webpack_loader',
     ...
)And adding the webpack configs:
WEBPACK_LOADER = {
  'DEFAULT': {
    'CACHE': not DEBUG,
    'STATS_FILE': os.path.join(BASE_DIR, 'webpack-stats.json'),
    'POLL_INTERVAL': 0.1,
    'IGNORE': [r'.+\.hot-update.js', r'.+\.map'],
  }
}What this library will do is that it will work webpack bundle tracker plugin that generated the file webpack-stats.json which contains the status of the compilation and the locations of the compiled assets.
⚠️ Don't forget to set the static path for production build to be matching the webpack output folder, in our example:
STATICFILES_DIRS = (os.path.join(BASE_DIR, "../dist/"),)Now adding the file to our template by adding the loader and specifying the bundle name
{% load render_bundle from webpack_loader %}

<head>
    ...
    {% render_bundle 'main_style' %}
    ...
</head>
Adding our first SCSS file + Bootstrap
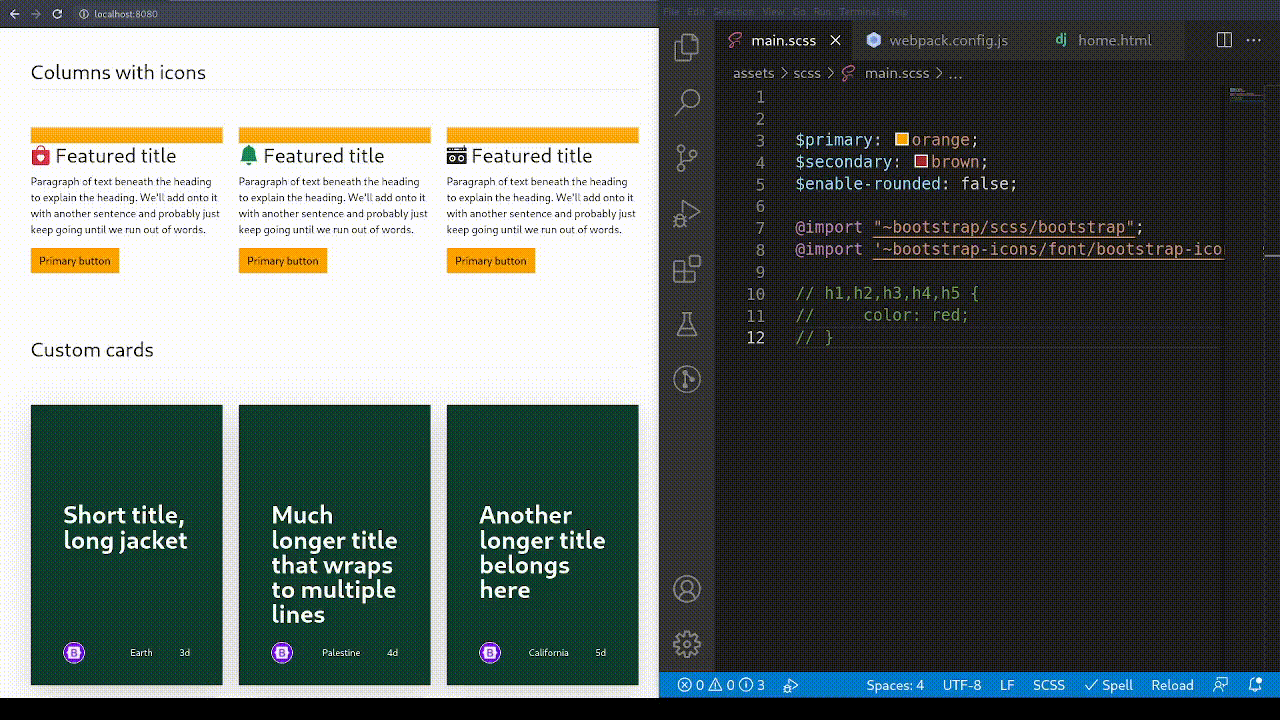
Lets start by adding bootstrap and use it to it's full potential as it was designed to be, we will also be using the bootstrap icons package as we have included font support in webpack:
npm install --save-dev bootstrap bootstrap-iconsNext we will create our first SCSS file as was defined in the webpack configurations ./assets/scss/main.scss
$primary: orange;
$secondary: brown;
$enable-rounded: false;

@import "~bootstrap/scss/bootstrap";
@import "~bootstrap-icons/font/bootstrap-icons.css";
📝 Notice here we use ~ symbol when importing to refer to the node_modules folder where we installed Bootstrap using npm
Using SCSS gives us the power to customize bootstrap, our website is not restricted to look like any generic bootstrap clone no more! We can also reduce the bundle size by only importing what we need. By explore the node_modules folder or github repository we can find the specific SCSS files we would like to import.
furthermore, upgrading bootstrap is easy as increasing the version in package.json and hitting npm install
since we have installed and imported bootstrap icons, using them is as easy as choosing an icon on the bootstrap icon website to copy, and pasting it:
<h2>
    <i class="bi bi-boombox-fill"></i>
    Featured title
</h2>
Using other frameworks
Using the same concept you can different css frameworks such as Bulma and icon packages such as ionIcons, and FontAwesome.
⚠️ Another popular framework is TailWind, however it requires some extra configs and I do not recommend using it without optimizations as the css file size can be easily over 3MB! We will have another article for TailWind where we use webpack and PostCss to optimize the output to few kilobytes.
📝 To note some of these packages don't provide a clear documentation on importing using SCSS. In these cases we need to dig into the github repository of the npm package to find the correct path for the scss or css file to import.
Let's test it all
Time for the fun part now. Run the Django server in one terminal and in another terminal we will use the npm script we added to run webpack.
npm run watchHot reloading is 🔥, no more switching between refreshing browser and IDE!
We also have the power of source maps to find the location of the classes used. When inspecting using the browser you can find out the file and the line number containing the specific class. This is specially useful once you start having large number of SCSS files.

Bonus: RTL for Arabic, Hebrew, and Farsi

For years developers struggled with building website with RTL support. Now days we lucky have the tools to automate the process and suffer no more.
We will be using rtlcss to automatically invert everything without any intervention for alignment. Furthermore, in 2021 Bootstrap introduced RTL support. Using bootstrap is not required as you can transform any style file.
To add support for compiling the style in RTL we will need to add some packages
npm install --save-dev postcss-loader rtlcssAfter that we will need to edit the webpack.config.js .
First we will need to add a new import
...
const rtlcss =  require('rtlcss');
...After that we will edit the webpack rules, we will need to have 2 separate rules for arabic/english. These rules should be identical except for test option and that for arabic we use postcss-loader with rtlcss() plugin.
In the example below we setup webpack to check the entry files extension based on if they end with .arabic.scss or .scss without the .arabic part. Below is rules section after the new edits:
rules: [
    {
        test: (filename) => {
            if (
                filename.endsWith(".arabic.scss")
                || filename.endsWith(".arabic.sass")
            ){
                return true
            }
            return false
        },
        use: [
            isDevelopment ? "style-loader" : MiniCssExtractPlugin.loader,
            {
                loader: 'css-loader',
                options: {
                    sourceMap: isDevelopment
                }
            },
            {
                loader: "postcss-loader",
                options: {
                    postcssOptions: {
                        sourceMap: isDevelopment,
                        plugins: [
                            [
                                rtlcss()
                            ],
                        ],
                    },
                },
            },
            {
                loader: 'sass-loader',
                options: {
                    sourceMap: isDevelopment
                }
            },
        ],
    },
    {
        test: (filename) => {
            if (
                filename.endsWith(".arabic.scss")
                || filename.endsWith(".arabic.sass")
            ){
                return false
            }
            if (
                filename.endsWith(".scss")
                || filename.endsWith(".sass")
            ){
                return true
            }
            return false
        },
        use: [
            isDevelopment ? "style-loader" : MiniCssExtractPlugin.loader,
            {
                loader: 'css-loader',
                options: {
                    sourceMap: isDevelopment,
                },
            },
            {
                loader: 'sass-loader',
                options: {
                    sourceMap: isDevelopment
                }
            },
        ],
    },
    {
        test: /\.(woff(2)?|ttf|eot|svg)(\?v=\d+\.\d+\.\d+)?$/,
        type: 'asset',
        generator: {
            filename: 'fonts/en/[hash][ext][query]',
        },
    },
]Now that we have added the new rules we will have 2 entry points instead of one, notice how the Arabic style ends with .arabic.scss as we specified in the test of our rule above:
 ...
 entry: {
            arabic_style: './assets/scss/main.arabic.scss',
            english_style: './assets/scss/main.scss',
        },
...While we can keep the main.scss as is, we dont want to rewrite everything in main.arabic.scss so we will just import the main style in the Arabic file as below:
@import "./main.scss";Next we need to Django template to render based on the user language. While setting the user language falls outside the scope of this article, below is an example of how we specify the correct style file and html direction based on the language.
{% load i18n %}
{% get_current_language as LANGUAGE_CODE %}
<!doctype html>
{% if LANGUAGE_CODE == "ar" %}
<html dir="rtl" lang="ar">
{% else %}
<html dir="ltr" lang="en">
{% endif %}
<head>
{% if LANGUAGE_CODE == "ar" %}
{% render_bundle 'arabic_style' %}
{% else %}
{% render_bundle 'english_style' %}
{% endif %}
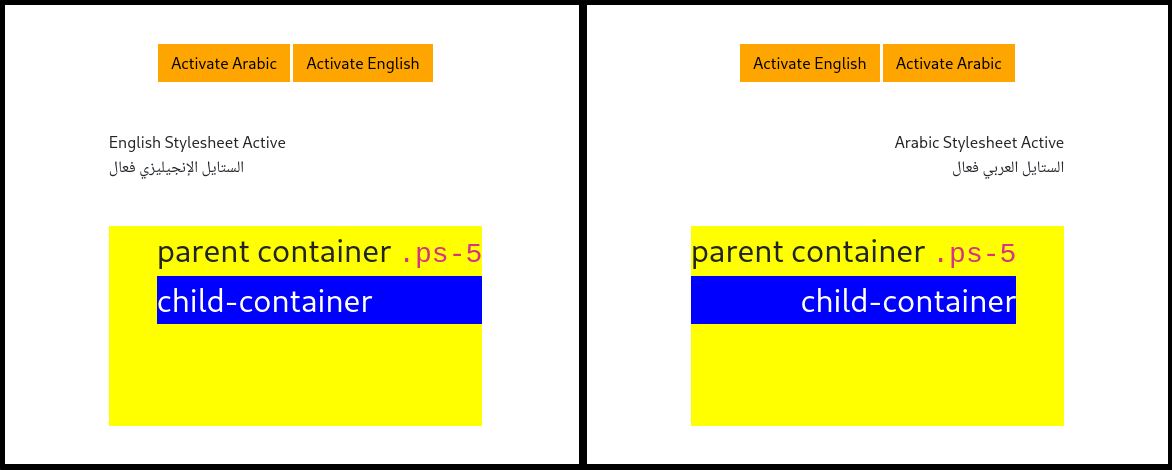
</head>Lets test it out, we will use the Bootstrap utility classes. In v4 we used to write pl-3 which translates to padding left 3, in v5 classes names have changed to be more directional friendly so now we write ps-3 which translates to padding start 3. Now you can start thinking of the elements as start/end based on the language instead of confusing left and right when using Arabic web page. Below is the difference between the Arabic/English when using the same structure and classes names but different language:
What’s next?
In this article we explored implementing SCSS processor in webpack with one of the most popular css frameworks. In the next articles we will explore including javascript files in a modular modern method.
If you have a problem and no one else can help. Maybe you can hire the Kalvad-Team.