#3 Pimp my Phoenix
Third article of a series about Phoenix and Elixir. This one will be focused on CSS framework implementation and simple custom form validation.


Discover the Phoenix Series
#1・Handle HTML & API authentication
#2・Automatic deployment
#3・Pimp my Phoenix
#4・Discord Bot & Stackable Queries
So far, we have learn how to create a Phoenix application, setup a user authentication logic and deploy it on the Internet of Computers™, so everyone can use it. Very cool.
But now, what ? I guess this is time to upgrade a little bit our user experience! We still have the design & templates that Phoenix generated for us at the very beginning. This is functional but not very eye candy. Let's change this.
This article will be fairly simple and beginner friendly : we are going to focus on implementing a CSS framework to pimp our website, organize our SCSS resources and update a little bit the recipe creation to add some custom validation.

CSS Framework
There is a lot of CSS frameworks out there and I really think this is a personal choice to pick one or another, unless you have strong specific requirements. For our project, and because I am used to it, we will simply use Bootstrap.
Bootstrap is a free and open-source CSS framework directed at responsive, mobile-first front-end web development. It contains CSS - and (optionally) JavaScript- based design templates for typography, forms, buttons, navigation, and other interface components.
Before installing anything, let's update our Node version. We used version 14.17.5 in the first article of our series, but Node LTS has been pushed to 14.18.1 since this day:
nvm install 14.18.1
nvm use 14.18.1
# nvm alias default 14.18.1
Then, go to assets folder and install Bootstrap:
cd assets
npm install -g npm # don't forget to keep npm up to date!
npm install bootstrap --save
cd ..
Phoenix settings
To be sure that we can use CSS & JS Bootstrap's features, we need to make some changes. First, let's import Bootstrap in our main JS file.
...

import 'bootstrap'
assets/js/app.jsSince Bootstrap is highly customizable using SASS, we have to rename our css files to scss and update a little bit the file name and organization:
mkdir assets/css/phoenix
mkdir assets/css/blocks
mv assets/css/app.css assets/css/phoenix/style.scss
rm assets/css/phoenix.css
touch assets/css/app.scss
touch assets/css/_colors.scss
touch assets/css/_blocks.scss
touch assets/css/_variables.scss
touch assets/css/block/_header.scss
touch assets/css/block/_footer.scss
touch assets/css/block/_recipes.scss
We removed phoenix.css because it was only containing some classes related to the generated template design, nothing interesting for us. Note that on the other hand we kept app.css and moved it to a phoenix folder because it contains some classes used by Phoenix (mainly used for form validation, modals, etc.)
We also created some files to handle the values that we will use to override Bootstrap default configuration and add some custom SCSS code.
Let's import everything we need in our new app.scss file:
// Fonts from GoogleFonts
@import url('https://fonts.googleapis.com/css2?family=Dancing+Script:wght@700&display=swap');
@import url('https://fonts.googleapis.com/css2?family=Inter:wght@300;400;500;700&display=swap');

// Required by Bootstrap
@import "../node_modules/bootstrap/scss/functions";

// Variables overriding Bootstrap values
@import "_colors.scss";
@import "_variables.scss";

// Required by Bootstrap
@import "../node_modules/bootstrap/scss/variables";
@import "../node_modules/bootstrap/scss/mixins";
@import "../node_modules/bootstrap/scss/root";

// Contain useful classes to handle Phoenix logics
@import "./phoenix/_style.scss";

// Bootstrap
@import "../node_modules/bootstrap/scss/bootstrap";

// Custom SCSS
@import "./_blocks";assets/css/app.scssWe should now be all set to add some custom design to our project!
Finally, after adding some other SCSS files to correctly split our design logic, we should have something like this :
css/
├── blocks/
│   └── _footer.scss
│   └── _header.scss
│   └── _recipes.scss
├── phoenix/
│   └── _style.scss
├── _blocks.scss
├── _colors.scss
├── _variables.scss
└── app.scss
_blocks.scsscontains every imports fromblocksfolder, this is where we will put our custom SCSS code._variables.scsswill contains values to override Bootstrap default settings. (For example, you can update the defaut forms design)_colors.scsscontains everything related to colors (thank's Sherlock).app.scssis our main file where we import evey other resources.
The way it is organized is pretty simple but very effective and readable. Of course, you can update it and create more folders / subfolders or split in an other way that will better suits your needs, but please, split it.
I've seen too many projects with a single mega file containing everything. The fact SCSS allow you to do this :
#my-element {
	.my-class1 { ... }
	.my-class2 { ... }
	.my-class3 { ... }
}
Does not mean that you don't need to keep your code humanly readable. I know that it can be such a pain for some developers to do design but remember to :
Always code as if the guy who ends up maintaining your code will be a violent psychopath who knows where you live.
For the sake of not drowning you in a copy pasta of hundreds of HTML & SCSS lines, you can find everything on this commit.
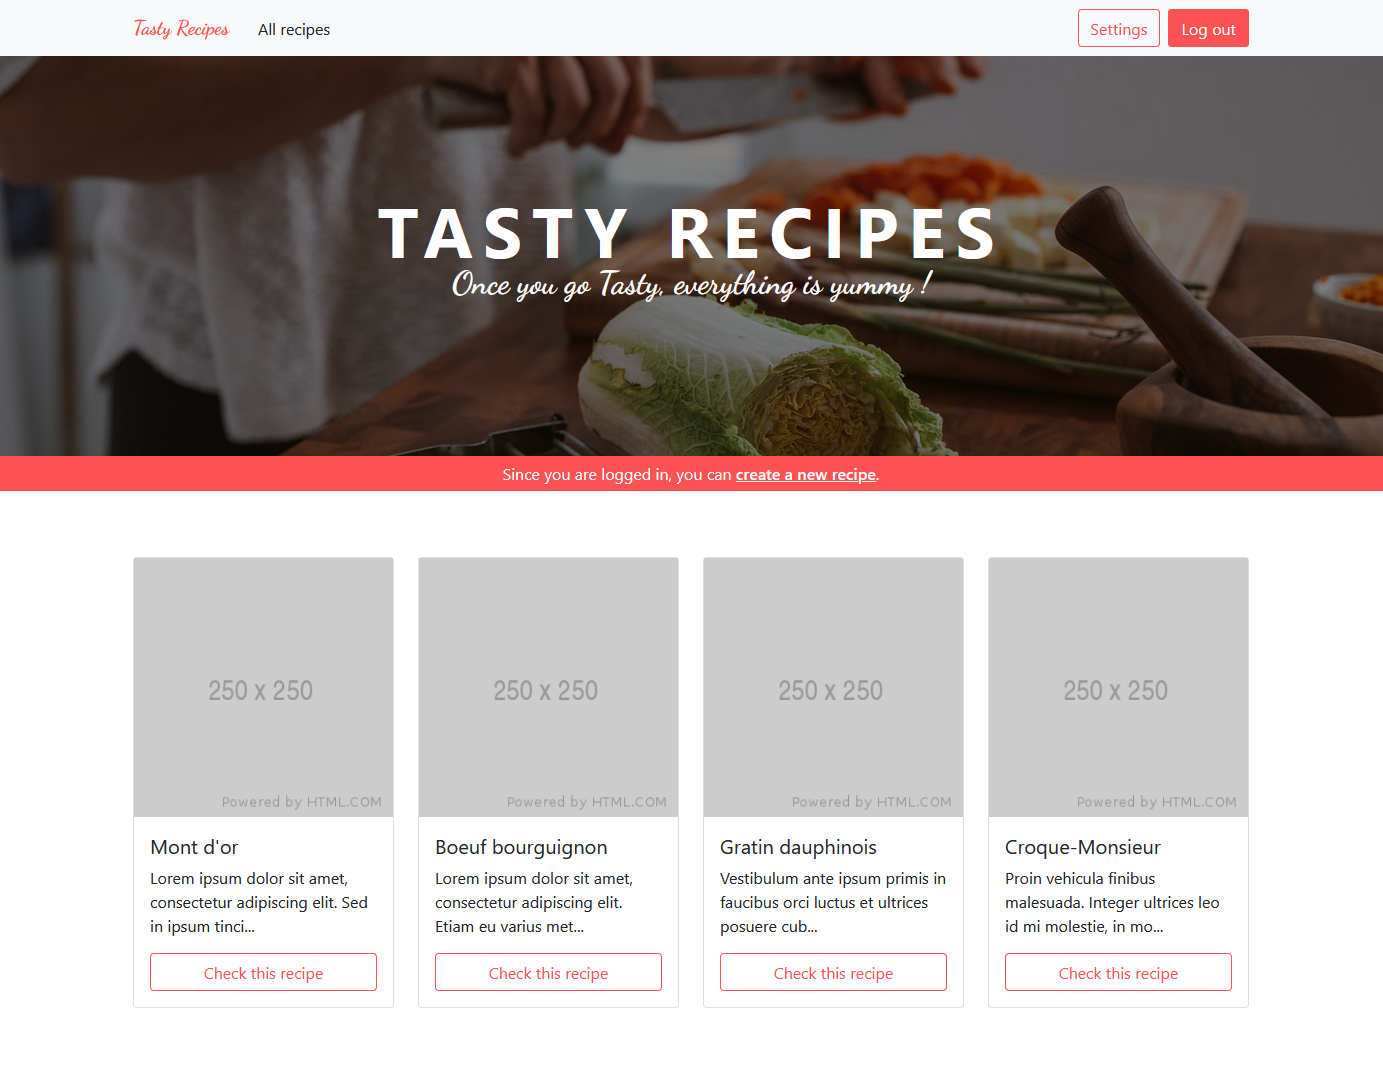
And tada!
Form validation
Since we use Phoenix LiveView, we have built-in live form validation. But after implementing Bootstrap, this is not working anymore... What the heck ?

No worries, this is simply because Bootstrap and Phoenix both use a class named .invalid-feedback for different purposes. Let's fix this.
Phoenix use this class to show users that the data they typed in a field is invalid

The best way to be sure it will not conflict with Bootstrap .invalid-feedback anymore is to update our error_helper and use .phx-invalid-feedback as class name to handle form validation.
  def error_tag(form, field) do
    Enum.map(Keyword.get_values(form.errors, field), fn error ->
      content_tag(:span, translate_error(error),
        class: "phx-invalid-feedback",
        phx_feedback_for: input_name(form, field)
      )
    end)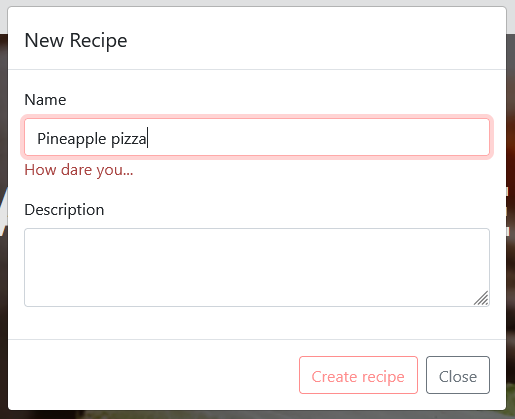
endlib/tasty_recipes_web/views/error_helpers.exWe could also add some more validation for recipe creation, since checking if fields are not empty is probably not enough. What if people tried to create a recipe... like... Pineapple pizza?

defmodule TastyRecipes.Recipes.Recipe do
  use Ecto.Schema
  import Ecto.Changeset

  @primary_key {:id, :binary_id, autogenerate: true}
  @foreign_key_type :binary_id
  schema "recipes" do
    field :description, :string
    field :name, :string
    field :owner, :binary_id

    timestamps()
  end

  @doc false
  def changeset(recipe, attrs) do
    recipe
    |> cast(attrs, [:name, :description, :owner])
    |> validate_required([:name, :description])
    |> validate_length(:name, min: 2, max: 32)
    |> validate_length(:description, min: 100, max: 1024)
    |> validate_name()
  end

  def validate_name(changeset) do
    name = get_field(changeset, :name)

    case name do
      nil -> changeset
      name ->
        clean_name = String.downcase(name)
        if clean_name =~ "pizza" and clean_name =~ "pineapple" do
          add_error(changeset, :name, "how dare you...")
        else
          changeset
        end
      end
  end
end
lib/tasty_recipes/recipes/recipe.exLet's check what's happening if we try to create a Pineapple pizza recipe:
Fine. Our design has been implemented, we know how to add custom validation. I think that will be enough for today's article.
See you next time!
If you have a problem and no one else can help. Maybe you can hire the Kalvad-Team.