N8N on Clever Cloud
A practical walkthrough for deploying n8n on Clever Cloud with PostgreSQL, basic auth, and a Git-based workflow, so you can self-host your automation instead of renting it.

Introduction
N8N is an "Extendable workflow automation", or as I prefer to call it: the open source IFTTT.
As you know, at Kalvad, we are big fans of:
- open source
- selfhosted
- automation
Why? Because it gives us the power to deploy a software where we want, to debug it and to focus on most important targets, like working on new technologies.
Few months ago, we were looking to automate some tasks at the office (changing the color of a light bulb every time there is a new deployment). As we were investigating a solution, we found something nice: n8n. Unfortunately:
- the software was still unstable
- it requires a public URL
Nowadays, thanks to the developers, the software is more and more stable. So we wanted to deploy it on Clever Cloud, as after all these years, Clever Cloud is our reference to deploy applications.
How to
Step 0: Create a repo
Everything on Clever Cloud is based on Git, so create a new repo on Github.
Step 1: Setup the code
Inside this repo, add the package.json
{
    "name": "n8n-clever-cloud",
    "version": "1.0.0",
    "description": "n8n on clevercloud",
    "dependencies": {
        "n8n": "0.125.0"
    },
    "scripts": {
        "start": "./run.sh"
    },
    "author": "Loic Tosser <wowi42>",
    "license": "ISC",
    "bugs": {
        "url": "https://github.com/wowi42/n8n-clever-cloud/issues"
    },
    "homepage": "https://github.com/wowi42/n8n-clever-cloud#readme",
    "engines": {
        "node": "^14"
    }
}
As you can see, the 3 major changes are:
- n8n as a dependency
- a script to start: run.sh
- definition of node version
Then, create the run.sh
#!/bin/bash
set -e
set -x

export N8N_PORT=$PORT
export N8N_PROTOCOL=https
export DB_TYPE=postgresdb
export DB_POSTGRESDB_DATABASE=$POSTGRESQL_ADDON_DB
export DB_POSTGRESDB_HOST=$POSTGRESQL_ADDON_HOST
export DB_POSTGRESDB_PORT=$POSTGRESQL_ADDON_PORT
export DB_POSTGRESDB_USER=$POSTGRESQL_ADDON_USER
export DB_POSTGRESDB_PASSWORD=$POSTGRESQL_ADDON_PASSWORD
export GENERIC_TIMEZONE="UTC"
export N8N_BASIC_AUTH_ACTIVE=true

if [ -z "$N8N_HOST" ]
then
    export N8N_HOST=$(echo "$APP_ID" | tr '_' '-').cleverapps.io
fi
echo "Host: $N8N_HOST"
env
./node_modules/.bin/n8n start
exit 1
make the file executable with chmod +x, and commit this 2 files.
Step 2: Prepare Clever Cloud
N8N can work with multiple "databases" (hum hum MongoDB), but as a sysadmin, I'm going to recommend you PostgreSQL.
On Clever Cloud, go to Create -> an add-on -> PostgreSQL -> DEV. Enter a name and you are ready for the database.
Then go to Create -> an application -> select your github repo -> NodeJS -> Select the instance size (XS is ok) -> enter the name and the description and click on create. Click on I don't need any addons. Then you can define your environment variables.
For your environment, you will need at least 3:
- N8N_BASIC_AUTH_PASSWORD: the password to access n8n
- N8N_BASIC_AUTH_USER: the username to access n8n
- N8N_ENCRYPTION_KEY: key used to encrypt the credentials before they get saved to the database
A fourth field is optional: N8N_HOST which will allow you to define the host used for n8n, as the default value will be the domain name in cleverapps.io, which is not recommended.
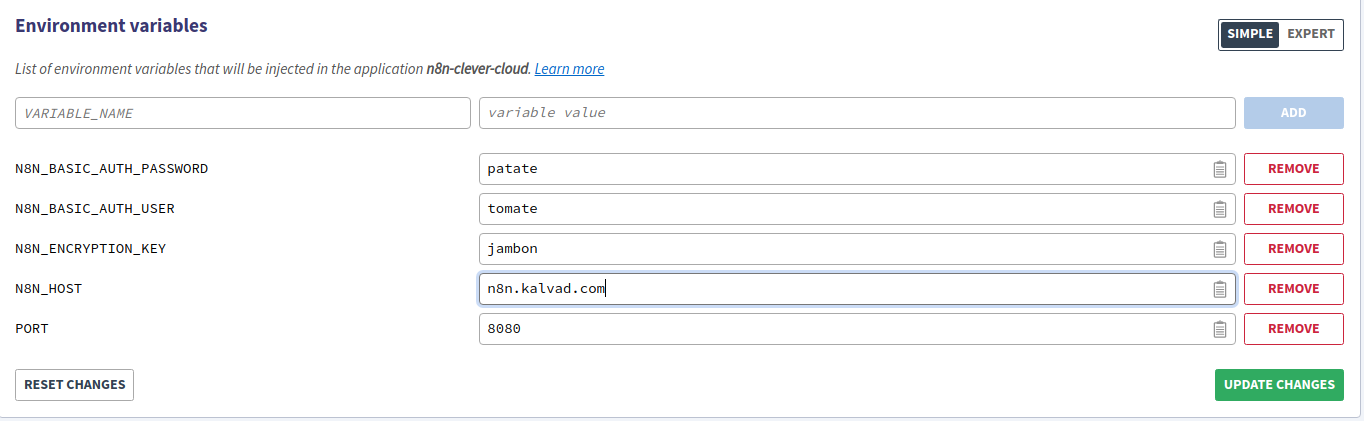
Then go to service dependencies and add the PostgreSQL database.

Finally, click on rebuild.
Step 3: Enjoy
You can now login on your n8n instance and start to enjoy it.
Example
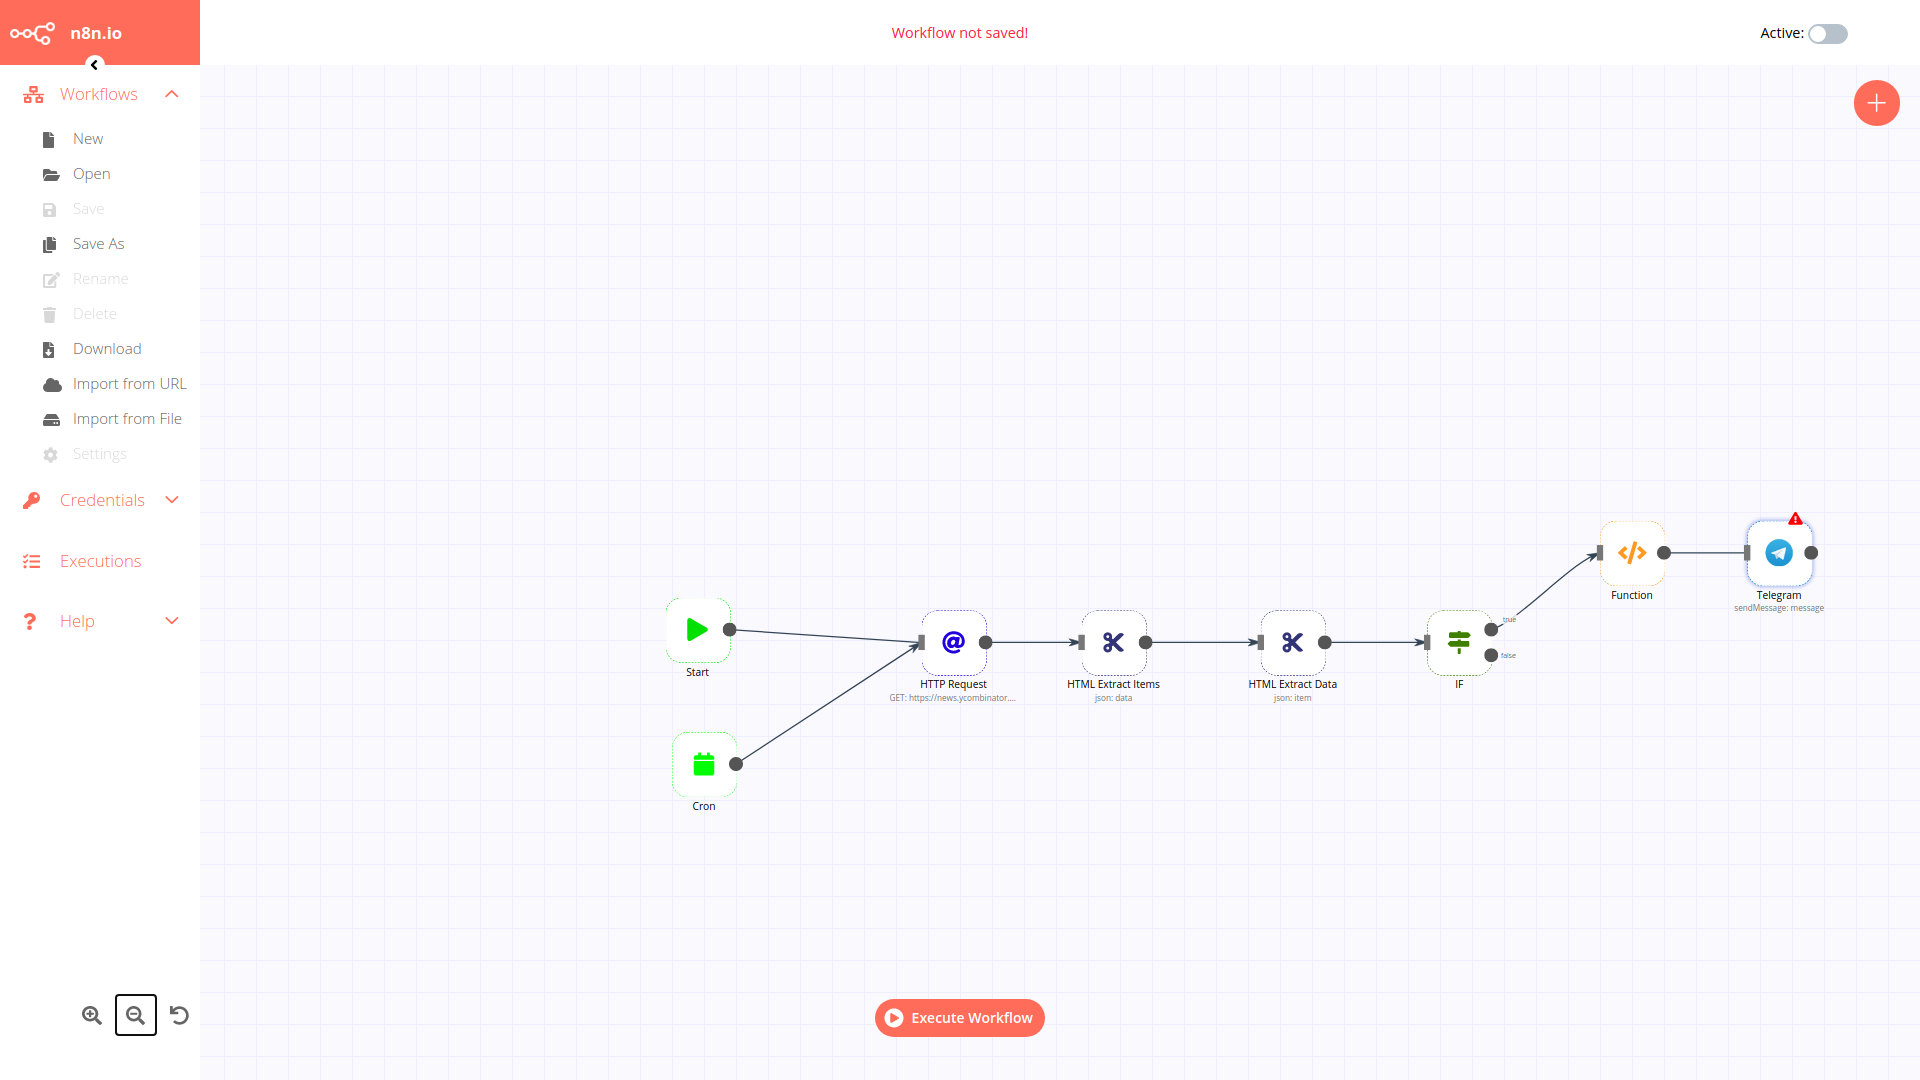
I will give you a basic example that triggers every day at 4am UTC, perfect for my breakfast time:
- Gets the current content from Hacker News
- Gets all the different submission items
- Extracts the rank, title and url
- Checks if it is a "Show HN" submission
- Combines the items into a simple text
- Sends an telegram message with the text
If you need help with the automation of your company, yalla, get in touch with us!
Need Self-Hosted Automation That Sticks?
We deploy and operate self-hosted automation stacks on platforms like Clever Cloud, with Postgres backends, proper secrets handling, and Git-based delivery. If your team wants n8n, Temporal, or custom workflow runners without leaking data to a third party, we can set it up, harden it, and keep it running. Fintech, government, and PCI-DSS workloads included. Deploy your automation with us.